PROJECT 3
SITCOM
PRE PRODUCTION
On our first week back after Easter Half Term break, we planned to make a sitcom show. In one day, we were all assigned job roles: Billy, Elkie and I were Show Runners. Oli, Oliver, Callum and Leah were all Actors. Sam and Cameron were the Writers. Chloe, Elyza and Lily were on Cameras. Freddie and Kai were Vision Mixers, and Daniella and Tia were Set Dressers. First we had a meeting with the Show Runners, Actors and Writers to create a plot and characters so we had something good to film for the next week. Eventually we came up with a great plot where Leah was an undercover cop who was spying on these 'criminals' who she thought was trying to do a proper heist, but turns out they were just planning on stealing a chocolate bar from their local corner shop.
After we had some sort of script written, we headed downstairs to start rehearsing the first episode, here are some of the pictures from that session.


SITCOM INTRO
During the pre production stage, we realised we will need an intro for the show, so I took on the role to make it. We took the shots just after doing the rehearsals and I directed all the Actors to do what and when, I filmed them with my phone which is the camera I had with me at the time, then I took all the footage I had and edited them together on Premiere Pro at home.
I first searched for a song that I felt was nice and upbeat with the theme we had, then put that into the timeline along with the other clips and edited them in how I wanted. The parts where I chose the freeze frames, I screenshotted the frozen frame of that scene for each character, and photoshopped each one so they had a white outline around their character and a different coloured background behind each one too. I then cut the clips to the beat of the song and then by using simple text and keyframes for the text, I had a good Intro. The Intro Video is below along with some of the cut out frames I had made.


Adobe Audition Guide
I made a guide to follow whenever I use the Adobe Audition program so my workflow can run smoother and more quickly when I need to edit audio.

Step 1
First, open and login to adobe audition. This picture should show you what comes up when you load up the program.

Step 2
Next, go to file > new > multitrack session.
This window should then pop up. From here you want to name your project, choose the save location, choose your desired template (if you have one), sample rate, bit depth and master.
(44.1KHz - 48KHz is normally the chosen sample rates).

Step 3
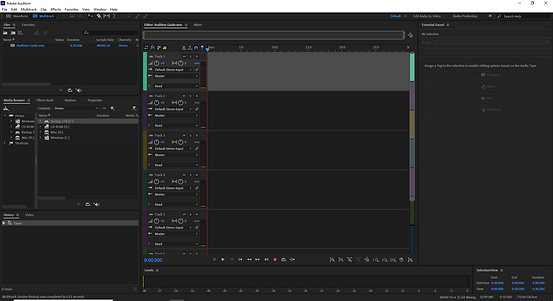
Once chosen all of your settings, this page will then load up. In front of you are 6 separate timelines with a master mix at the bottom. On the left is your info and your files where you can drag your audio into. On the right as default are your preset options. At the bottom is your volume, you want to make sure that it never goes into the red otherwise distortion of your audio clip will happen.

Step 4
From there, you want to drag in an audio clip of your choice, which you can do straight to the timeline where you can drop it there and will appear with the waveforms in one of the timeline slots out of the 6 available.